Adding Reads
Before any reads can be uploaded, metadata concerning the reads needs to be
entered into EnteroBase. This is done at the upload reads page (Tasks ->
Upload Reads in the left hand menu)
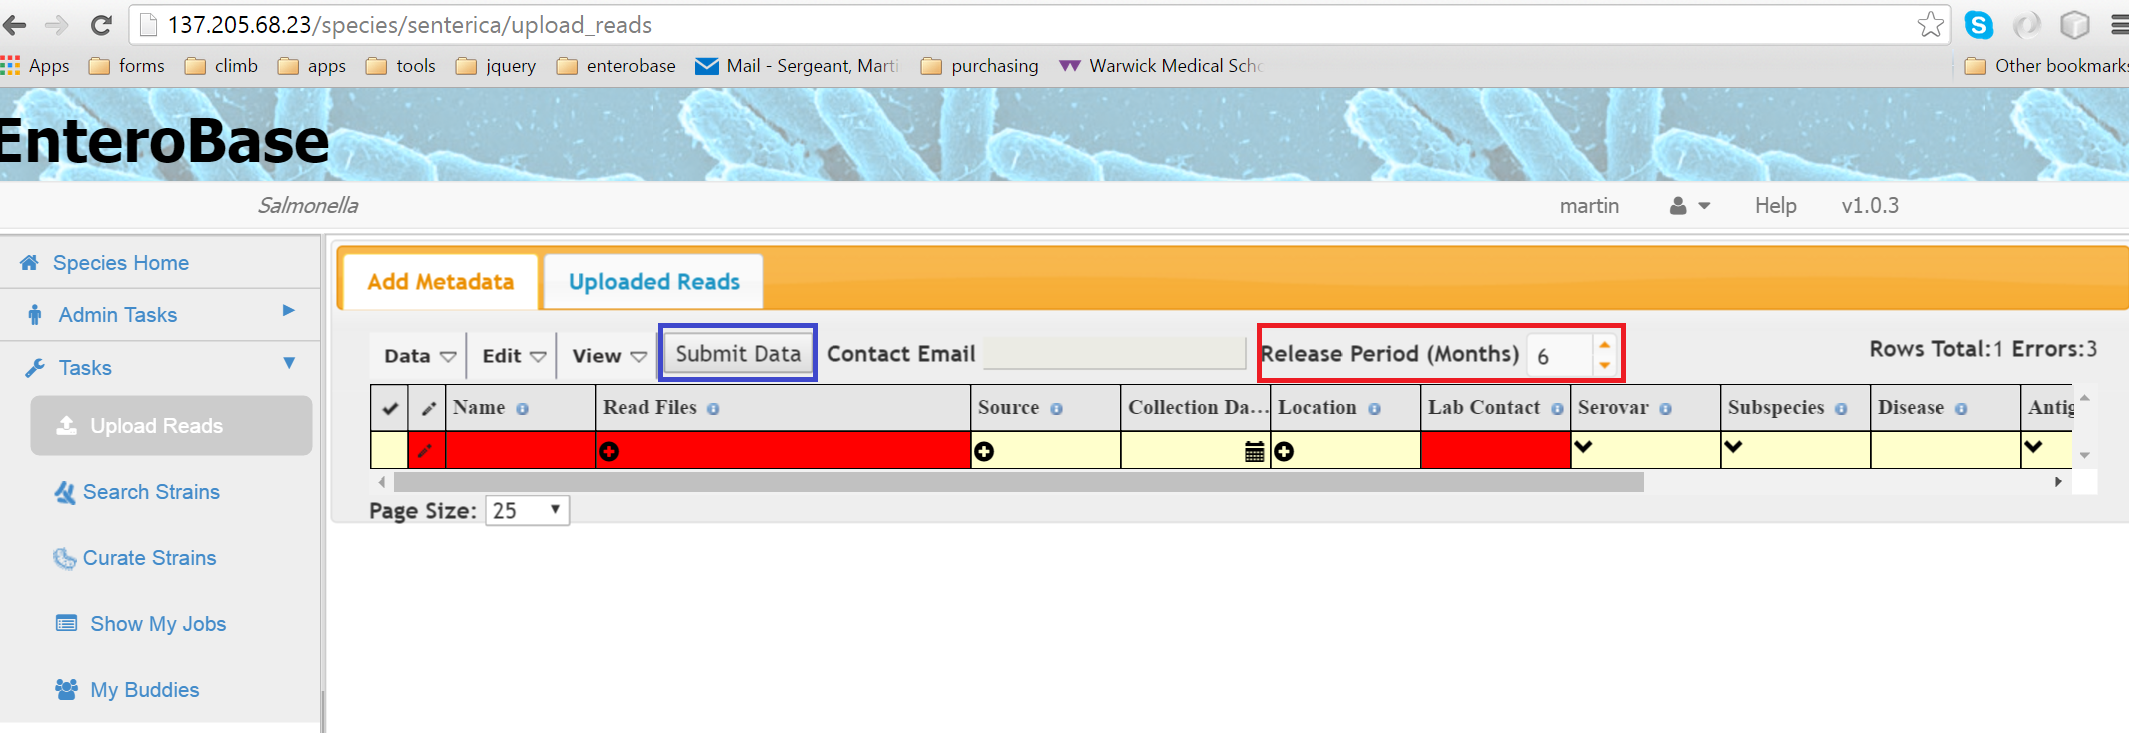
Figure 1 Upload Reads Page
Adding Metadata
Adding Metadata Manually
When the page first loads,a single blank row is displayed (Figure 1) where you can enter metadata concerning the reads you are going to upload. Any compulsory fields are shown in red. Clicking on individual cells allows you to enter data either by typing directly or selecting from a drop down box, depending on the field. Extra rows can be added by Edit -> Add Blank Row or by right clicking on the table and selecting Insert Row. To enter information about the reads themselves, click on the Read Files cell and a dialog will appear (Figure 2)
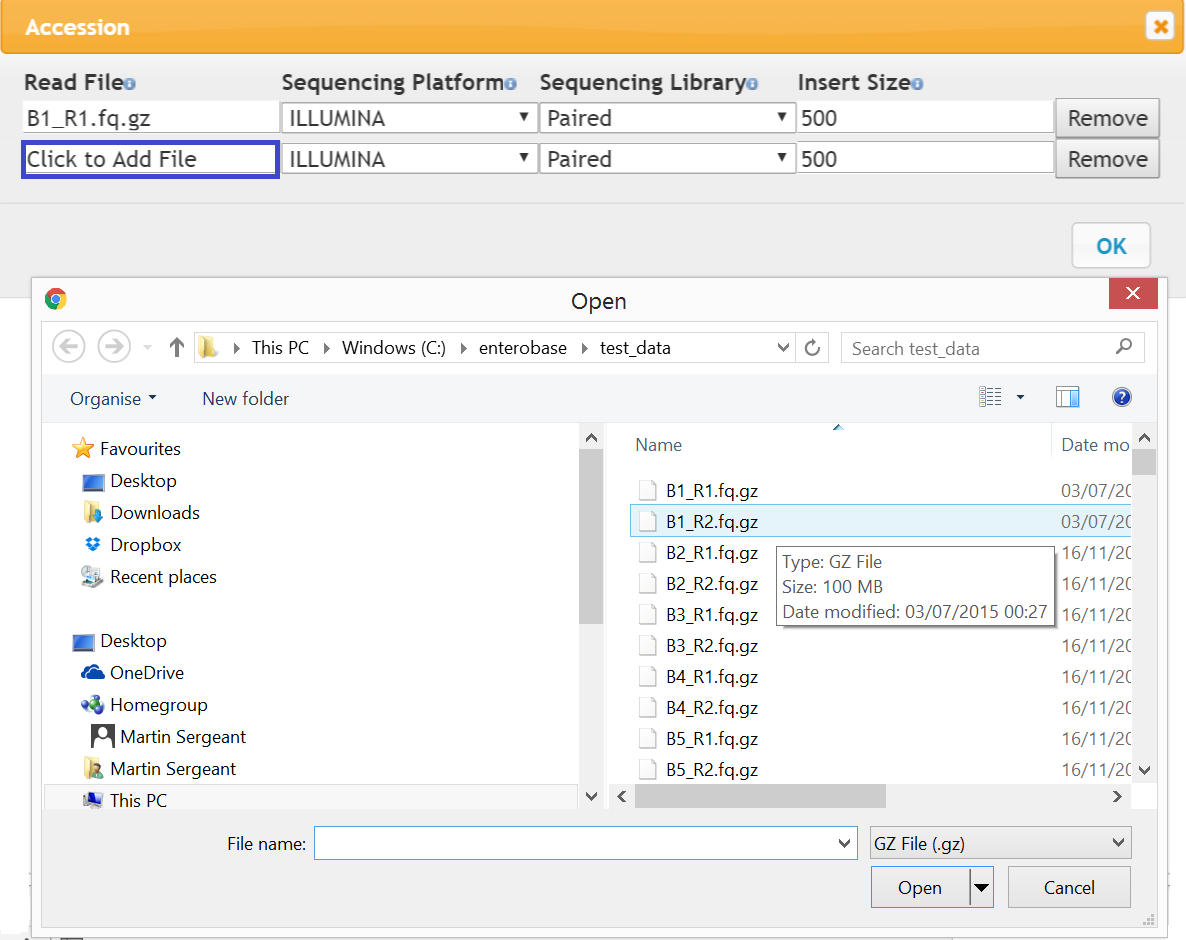
Figure 2 Read Dialog
By default the reads are Illumina, paired with an insert size of 500. Click to Add File (blue box in Figure 2) and a file dialog will appear, select a read from a local directory and press OK. Preliminary checks on the read file such as size and fastq format will be carried out and you will be informed if the read is not acceptable. You can also right click on the Read File box and type the file name in directly, in this case the file will not be checked until it is uploaded.
In addition to Illumina reads, high quality complete genomes can be added by trusted users. To do this, in the reads dialog remove one of the read entries and change Sequencing Platform to ‘Complete Genome’ and Sequencing Library to ‘Single’ and then add the appropriate file (.fasta) as above.
When all the data has been filled in correctly, the Submit Data button will become active and can be pressed (blue box in Figure 1). You will then be taken to the Uploaded Reads Tab.
Adding Metadata From a File
If you have many reads to upload it may be easier to add the Metadata from a file generated in excel or using a script. The file needs to be text delimited and a template is available at EnteroBase.warwick.ac.uk/static/example/upload_template.txt. Both read files, separated by a comma need to go in the Read Files column. The file format is flexible, not all columns need to be present,the column order does not matter and any columns not present in the database will be ignored. For example, for the bare minimum (which depends on the criteria of the individual database), the following file would be acceptable:
Name     Read Files                                                  Lab Contact
bug1     bug1_S7_L001_R1_001.fastq.gz,bug1_S7_L001_R2_001.fastq.gz   Sanger Centre
By default, reads are Illumina and paired. To specify a different read type, the Sequencing Platform and Library type must be specified in the Read Files column, separated by a semi colon. For example, to specify a Complete genome, which is the only other type available to date (please ask for permission), the following file would be used:
Name     Read Files                           Lab Contact
bug1     bug1.fasta;Complete Genome;Single    Sanger Centre
The date should be in three columns, Collection Year (4 digits), Collection Month (1-12) and Collection Day (1-31). The reason for this is that excel will format date columns in unpredictable ways. Also if only one column represents the date, and only the year is entered, default values for month and day are added. If they are separate columns, it is much easier to add partial dates.
To load the file, go to data > Load Local File and open the file. The data should appear in the table. If there are errors, mouse over the red cells to see what the problem is. When all errors have been corrected, the Submit Data (blue box - Figure 1) should become active.
Release Period
The Release Period input (Figure 1 red box) specifies the amount of time in months that your reads will remain private. This means that assemblies and annotation files cannot be downloaded by others unless you give them permission.
If you want to make your genome(s) private you need to alert the “Release Period” input and set the number of months which you want to keep the genome(s) private (up to 12 months).
Uploading Reads
Once the metadata has been submitted, you will be taken to the Uploaded Reads tab and information about read status will be shown the left hand table (red box in Figure 3)
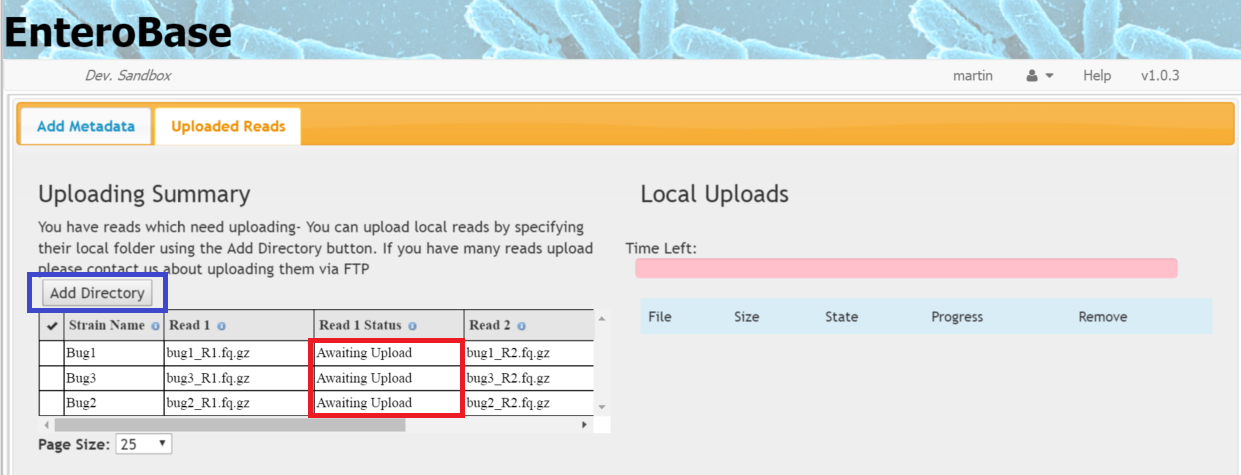
Figure 3 Uploading Reads
- Read status can be one of Four values:
Awaiting Upload - metadata has been added but the read has not been uploaded
Local Upload - The read has been found on the local file system and is ready to uploaded
Uploaded - The read has been uploaded but has not been processed, usually this is because the second read in the pair is absent
Processing - The read has been uploaded and is being assembled
If you clicked on a file in a file dialog, the status will be Local Upload, however if you loaded the name in a file or typed the name in the file dialog, the status will be Awaiting Upload. There are two ways to find the files on you local system
Click the Add Directory button (blue box in Figure 3). A file chooser should then appear. In some browsers, you can just select the folder where the files reside, in others you have to select all the individual files that you want.
Drag and Drop Files onto the right hand area of the page
Once the files have been located they should appear on the right hand of the screen with the status ‘pending’ and the Start Upload button will initiate the transfer.
Bars which show the progress of each upload are displayed, as well as a bar which displays overall progress. You need to remain on the page until all the reads are uploaded. However, if the there is a loss in connectivity or another interruption, you can simply refresh the page and upload any remaining reads. Note Due to security restrictions, if you refresh or return the page you will have re-associate your reads by either the Add Directory button or by Drag and Drop.
If want to delete the metadata that you have uploaded, select the rows you want to delete (shift + click to select multiple reads) and right click > ‘Delete Selected Row’ . You cannot delete rows associated with reads that are already being being processed.
Associate New Reads with an Existing Strain
If your assembly failed QC, or you have better quality reads for a strain that you previously uploaded into EnteroBase then you have two options.
You can enter the metadata again specifying the same strain name but different read files (obviously). The strain record will also be updated by any new/changed metadata that you add
On the Main Search page select ‘Edit Mode’ or use the ‘Curate Strains’ options on the side panel and then in the right hand grid, right click on the assembly that you own and select ‘Associate New Reads’. Enter the names of the new read files in the dialog and press submit. These reads can then be uploaded by going to the Upload Page (see above) in the normal way. This cannot be used to replace upload a new assembly.
Troubleshooting
If your reads have successfully uploaded, you can check they are being assembled by going to the My Jobs page. If there are no jobs displayed here, go back to the the Upload Reads tab of the upload page and check whether the status is Awaiting Upload - If so the reads have not been uploaded and you need to retry uploading them If after you have associated local files (by clicking Add Directory or drag and drop) they do not appear on the right hand of the page, then check that the names of the files in the left hand table exactly match the ones you are trying to associate.